12/30/2012

Game Boy DMG Screen Repair


After buying an old school Dot Matrix Gameboy (DMG) from Ebay only to find that twelve vertical lines were blank, I sought instructions and prices on replacing the screen.  In my searches I found this little blog about how to repair vertical lines on the screen.  To the left you'll see my DMG with several lines missing on both the left and the right of the screen.  Opposite of it is the pic after surgery. Written by Max Justicz, the site Restore and Modify an Original DMG Gameboy is excellently written and illustrated.  I want to stress the importunates of the final step in letting the solder completely cool.  Rather quickly I got it down to just two stubborn lines, by being meticulous and even allowing the solder to completely cool ( turn off and fetch a snack ).  M.J. also goes on to explain and illustrate the installation of a aftermarket back light.  Gosh I feel so tingly. We'll keep an eye on Max Justicz future projects! -kaokensho

12/24/2012

Floppy Disk Symphony Mod

Okay kids, everyone say hello to MrSolidSnake745, the floppy drive musician.  If I understand correctly he started out with just four drives, but as people like myself discovered the awesomeness, others began donating old drives for his cause.  He has recreated themes from Mortal Kombat, James Bond, Yoshi's Island, Skrillrex, Star Trek, and the pictured Ghostbusters.  All total there are 56 jams posted to his You Tube Channel.  Bottom line is there is something for everyone and you owe it to yourself to watch!
-kaokensho

11/16/2012

Sega Saturn Backup Battery


So I am on a personal mission to collect video game systems ( I've hit the age of more collecting and not as much playing).  At a rate of about two a year, I am starting with systems that I have never owned.  Enter the Sgea Saturn.  (enter gong sound here)  I didn't think much of the initial setup screen (shown on the left...no...the left) until it showed itself after the second and third boot.  Right away I know there's a dried up battery in there somewhere.  But where?  Wisdom has taught me, finally, to do some recon before reaching for the chainsaw.  Come to find out it's easy peasy.  If one were to hold the Saturn while facing the rear of the unit there's a secret door the size of titan on the left....shown open on the picture to the right....This calculator sized battery known to men of science as CR2032, can be bought at any WalMart for a few bucks.  There is a place to slide your hydrospanner or fingernail under it and pop it out.  Repeat the process in reverse.  Rinse. On a side note, the next Sega system known to everyone as the Dreamcast also uses CR2032 in its Virtual Memory Units (VMU).  -kaokensho

9/15/2012

Wii Nunchuck LED Addition


This guys turned out way better than mine did.  Don't get me wrong mine looks great but
it took longer than it should.  These instructions come straight from the hack-a-mod web
site.  There are several other posts and sites out there involving the same idea but this
is the only one I could find without broken links.  

IMG_0013.JPG
IMG_0017.JPGIMG_0020.JPG

Items needed:
1 Tri-wing screw driver. (just google tri-wing to find one to buy)
1 LED color of your choice (3mm)
1 12v resistor (if you care about battery life)
1 nunchuck
1 15watt soldering iron
solder
electrical tape

First use your Tir-wing screw driver to unscrew the nunchuck. Force off the top as it has 2 clips that it connects to.  (kaokensho note for the novice: search ebay for bulk deals on tri-wing screw drivers + NDS hinges or something like that.  Chances are you can get a tri-wing + parts for the same price as buying it by itself.)
Second, bend your LED to look like picture one (the long leg of the LED is the positive ( + ) on and the short is the negative ( - ) . If you want to save battery power, cut some of a leg off and add a resistor to it. Place a piece of electrical tape on the nunchuck PCB board to avoid shorts.
(kaokensho note for the novice: the longer lead of your LED goes to the positive.  Also notice that there is electrical tape over the board to prevent any shorts!)
Then you are going to solder the legs of the LED to the test points on the nunchuck that I have pointed out for you (if you have trouble with the small test points i have listed alternates). Plug the nunchuck into your wiimote to test it out.
If you get your light to well... light up, you've done it right. Put the guts of your nuchuck back into its body and screw it back in. And thats it!!!! 

-kaokensho

9/09/2012

MEGA DOOM


I have no prob admitting to being a fan one of video games most well known icons, Mega Man.  I listen to The Megas righteous tribute rock, paste mega art work on everything, play Mega Man 2 semi-regularly just to keep fresh.  So when I finally stumbled on this...well I had to play it.  Problem is I can't seem to find it anywhere!  The project started in 2009 and has since become difficult to find.   Full info can be found at DOOM Wiki which is where this little snippet comes from:

MM8BDM strives to unify Doom-style gaming with Mega Man's game world.
All of the graphics have been changed to the colorful 8-bit Mega Man graphics. A number of new graphics were also added.
The default weapon is Mega Man's Mega Buster for all robots.
Most weapons have been changed to fire projectiles rather than use hitbox detection. There are several weapons which use hitbox detection, though these weapons aren't necessarily more powerful than the projectile weapons.
There are 60 new weapons the player can use; each Robot Master's weapon is in the game, as well as some extras!
Every Robot Master from Mega Man 1-6 is playable, as well as various other characters from the series.
Every character has been given a number of new animation frames as well, since none of them possessed the other four angles of movement that Doom characters do.
In fact, all moving 2D objects have a newly-made full range of animation frames! (As well as the occasional stationary 2D object.)
A number of items in the game which the player can use to help them along.
An impressive amount of new deathmatch levels -- 53 in total -- as well as 9 capture the flag stages.
A single player story mode, where the player works their way through the robot tournament, fighting computer-controlled opponents and many deadly bosses.


That horrible...horrible...MegaMan movie.  "Where did Dr. Light put that self destruct button!?!?" 
-kaokensho

iCade

I love amazon, even if I don't buy a product from them they're a great source of product info from suckers just like me.  When I saw the above image I decided to search it out on amazon.com.  Turns out there are a few different schemes.  The following is a well written product review by J. Harvey that answered all but one question....


       First I should mention that the iCade cabinet design may look like the picture on this page, or one with a more rainbow look to it. Don't worry though, it looks great. Very 80s.
       The hardware itself is excellent. The joystick and buttons are super-responsive, just like a real arcade machine. Assembly was a little annoying; the screws and holes didn't always line up too well. Once you get it together, though, the construction is solid.   It uses two AA batteries for power, and comes with them, which is nice. There's a port for an AC adapter, too, but it doesn't come with that and the manual doesn't give its specifications. It says you can buy one on ION Audio's website, but even now (March 2012) it doesn't appear that you can. I asked ION about this and they said that batteries provide 70 hours of use, so the lack of an official AC adapter isn't a big deal. They also told me the AC adapter you need is 5V DC, 110V AC, 500 mA pin negative, so if you want one you may be able to find one on the internet somewhere.
      There's no power switch, you turn the iCade on by pressing one of the buttons or moving the stick. There's a lighted coin slot on the front that acts as a power light. When you don't use the iCade for a few minutes, it turns off automatically, which is nice for conserving battery life.
       The iCade connects to the iPad over Bluetooth. It works fine, though you'll want to turn the Bluetooth on the iPad off when you're not using a related app, since the iPad thinks it's a keyboard and won't display the on-screen keyboard in other apps, like Safari, while it's connected.  The only software that supported the iCade on launch was the Atari's Greatest Hits app, which comes with one free game. At first it was Pong, but now it's Missile Command. It may change to a different game later. The app has 18 arcade games and 82 Atari 2600 games. You can buy a 4-pack of related games, like Centipede and Millipede for both arcade and 2600, for $0.99, or you can buy all 100 games for $14.99.
       I bought all the games for simplicity's sake, though they're not all gems. Most of the arcade games are good or at least OK, but frankly, most of the 2600 games suck. Backgammon? Circus Atari? Concentration? Really? Some surprised me, like Battlezone, which is almost better than the arcade version. Some classics like Adventure are here too, plus unreleased prototypes like Combat 2. A lot of the arcade games are vector games, like Asteroids, Battlezone, and Tempest to name a few.
      The iCade supports portrait and landscape mode, though the iPad is a lot more secure in portrait. In portrait, you place the iPad between two ridges that make up a stand, the front of which is notched so you can access the home button. In landscape, you place it in a little groove in front of the portrait stand, and unlike in portrait, it can slide around in there. For either position, if you have an iPad case, you'll probably have to take it off in order to get it to fit.  Whichever orientation you choose, you can fiddle with the settings in Atari's Greatest Hits to have it display the way you want. For most games you just have to change the "Orientation" option, but for other games you have to change the "Control type" to Arcade. It would be nice if there was an option that changed it globally, but it does save your options for each game, so you only have to change it for each one once. I tend to like portrait mode better; the iCade was obviously designed for this mode, and the arcade games look more authentic.
      Unfortunately, you can't adjust the joystick sensitivity in the app, so it's much more difficult to control games with paddles, like Pong, Warlords, and Breakout. I actually prefer to use the touch controls for those games. For most of the other games, though, the iCade controls are far superior.
      There are plenty of third-party games now. The most recent, updated list is at [...]. For some reason, iCade-compatible games can't be listed as such on the App Store. I haven't tried too many of them, but if your iPad is jailbroken you can get iMAME4All, which supports pretty much every classic arcade game imaginable. If you know what MAME is, that may be enough to push you to get this.
      Overall, I don't think it's worth buying an iPad specifically for this, since you could put together your own full-size arcade machine from various parts (cabinet, screen, PC with MAME, speakers, etc) for not much more. Still, if you have an iPad already, it's great fun and very worth the price of the iCade. I got it for $100 right at launch and that was probably too much, but I couldn't resist. Even when I'm not using it, it makes a great conversation piece. If this were $50, I'd give it five stars.

-kaokensho

8/10/2012

Bacteria's "Mini-Platform" Plug N Play Mod

I found this on engadget.com and while I mixed feelings about it one things for sure,  There's nothing else like it that I've seen.  Like most projects I post here this took quite a bit of time.  Confused?  Watch the vid!


Console modder "Bacteria" sure managed to turn a few heads with his previous multi-platform console mod, and he's now done it again with his new so-called Mini-Platform Plug 'n' Play Console System, which boasts the same, uh, distinct look we've come to expect. At the moment, this one relies solely on a variety of TV plug 'n' play game systems for its gaming options, which Bacteria converted into a more convenient cart form, although he also promises to make a GBA add-on for the system "in due course." As you can see in the video after the break, despite appearances, the system appears to work quite well, and you can even find step-by-step plans for building your own by hitting up the read link below.

7/26/2012

1st Gen Sega CD PC

Yes, while PC modded cases are more popular than ever, there are a few that fit right into the theme of certain fabulous blogs.  Introduce the Sega CD PC.  This project was actually completed in 2004 and posted on a great site full of PC case mods called, "mini-itx.com."  I found this link in Joe Grand's book Game Console Hacking, which is slightly outdated but extremely informative and a good source for brain storms.  Check it out!

The "SEGA-ITX"By Jay Phillips - Posted on August 25, 2004
Introduction
After seeing all the great mini-ITX projects I was tempted to make one of my old 8-bit computers into a PC, but not being able to use the original keyboard was somewhat of a disappointment. Also I would have to invest in a laptop CDROM and a small HD in order to cram it all in. What I wanted was a mini-ITX project that would cost me as little as possible using parts I had from other PC's. Then while putting Christmas decorations away in the basement I noticed the old SEGA CD box I used to store old computer parts and voila I had my next project!
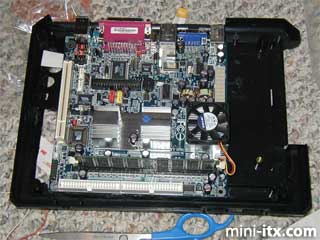
The motherboard I chose was the EPIA M10000 Nehemiah core 1GHz with CLE266 North Bridge. For parts I already had a stick of 256MB DDR, a DVD ROM, and an old 10 Gig HD. Everything else is built in to the MB. All I purchased was the MB, a power supply, and some buttons.
The original SEGA CD system was perfect for my project. The CD case is very tall and the original Genesis sits on top. After gutting the insides of both cases, saving the parts for nostalgia sake, I test fit a DVD and HD to see what configurations were possible. I hadn't yet purchased the MB so I wasn't sure how high it was.
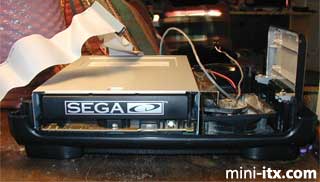
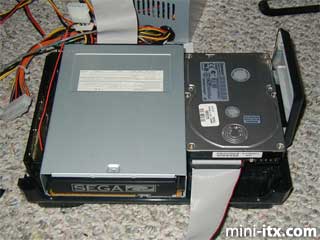
My first arrangement looked something like this:
Click to launch image viewer

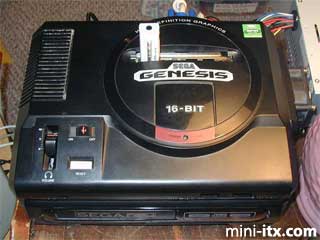
You can see at this point the right side of the CD case contains just a fan (not tied down). Notice I was able to save the SEGA CD face and with minimal trim fit it to the DVD.
Click to launch image viewer

I used metal HD mounts on the sides of the DVD as horizontal spacers and my tie down of choice, bailing wire, to fasten the drive to the bottom of the case :) The DVD barely fits in the CD case. The SEGA CD is actually smaller than a standard CD drive. I had to try several IDE cables to find one that was thin enough, and I had to cut off about an eighth if an inch of the top of the power cable so the wires would bend around. You can see the plastic piece still hanging on the wires.
Click to launch image viewer

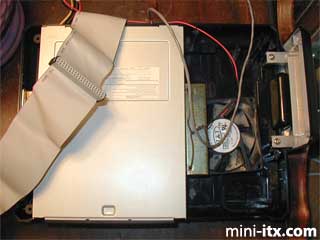
I cut a hole through the top of the CD case and in to the bottom of the Genesis case big enough to fit the HD on top (Don't do this! Read more later).
Click to launch image viewer

Here you can see the HD barely sticking up through the bottom along with the cables from below.
Click to launch image viewer

Once the MB arrived I immediately realized it wouldn't fit in the Genesis case with the HD sticking through, so don't try doing this. Just cut a small hole in the two cases to let the power and cables stick through. Having a big hole made it hard to mount the MB.
Click to launch image viewer

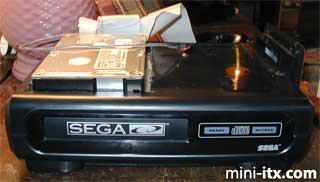
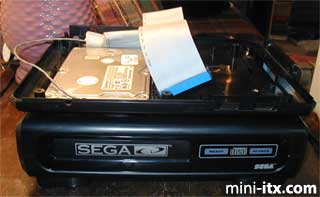
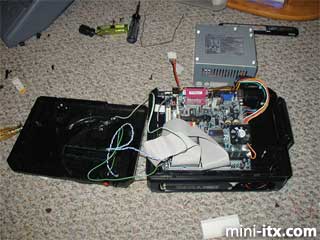
Here is plan B with the HD next to the DVD. Believe it or not I used Legos as spacers to raise the DVD up. The left side of the DVD still has a metal HD mount attached as a horizontal spacer, but the mount on the right side of the DVD is now screwed into the lower 2 holes as a riser for the HD. To cut down on vibration and to fasten it I used double faced thermal tape.
Click to launch image viewer

I wanted to use the SEGA power switch and volume control on top but that didn't work out. There wasn't enough vertical clearance with all the buttons hanging down so I had to cut off the bottoms (notice lots of black plastic chunks lying on the floor). On the back I put nice buttons to turn the system ON/OFF and Reset. I used front panel connectors I had from an old PC and wired them to the new switches, and I also replaced the Power ON LED.
Click to launch image viewer

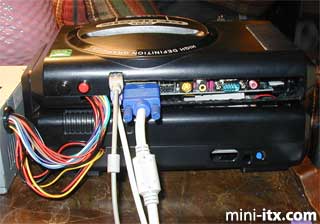
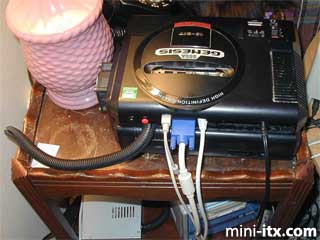
On the back I really didn't want to cut out so much plastic, and using the nice face plate was out of the question with the curved back of the SEGA case, so I only cut out enough space to fit the cables I was most likely to use. With a minimal cut I can access everything except the printer port which I doubt I'll ever use. I may also have to cut out a little more on the right side to reach the top audio connector. The power and reset buttons can be seen here and the big ugly internal power supply cables going into the top and bottom. I have looked into replacing those with one cable from a nice external supply but from what I have read the external supplies don't have enough watts for full size CD or DVD drives.
Click to launch image viewer

I made a "cable" out of three old power cables. I cut the ends off each cable then wired the ends to a 12 position barrier strip. A tip if you're doing this at home, make sure all three power cords are cut to the same length or you'll have to unwire, cut, and rewire it, and make sure the cables aren't twisted all around each other. I'm not opening the case again to get pictures, it's too packed, so I will describe what I did. I looked at the power connector on the motherboard and mapped out the wire colors and did some research on the web about ATX power cables. There are basically 9 different wires, +3v, +5v, +12v, -5v, -12v, Ground, and 3 wires that remotely turn the power supply on/off from the button on the front of your PC.
Inside the three power cords are 3 wires. I labelled each power cord A, B, and C, and wired them to the left side of a barrier strip. Then I cut all the power cords to the PC and wired in only one of each color wire, red, orange, yellow, black, white, green, gray, blue, and purple to the right side of the strip. The other end of the power cords I wired in the same order as the first strip to a second strip, so labeling your cables is important. And this is were it gets tricky. There are about 10 black wires, 8 orange, etc. that need wired into the corresponding strips to match those on the power supply end. You can get at most 3 or 4 wires wrapped together to fit in a strip, so I had to be creative which is why I chose a 12 position strip. There are 3 unused connections. Black and orange are the most common wires so I "jumpered" two of the extra connections to black by running wires between them, and the other connection I wired to orange. Then I divided up the black and orange wires into groups of 3 or 4 and wrapped and wired them into the left and right sides of the strip. The rest of the colors only had 1 or 2 to connect and were much easier. I also cut and wired in the two IDE power cables. Then used tie downs to hold that mess down to the case.

On the power supply end there were even more wires, but since I was only using one of each color wire the rest were unused. I cut all of them off and covered the ends with electrical tape to avoid contact. Then I was left with the three cables. I bought a plastic tube from Radio Shack which is split down the center. Simply shove the cables down in the tube from one end to the other. Then I made the hole in the SEGA case bigger to fit the power tube. And finally I opened up the power supply and put the strip, the tapped off wires, and the end of the power tube inside and sealed it back up. Now it looks nice and professional. ;)
Click to launch image viewer

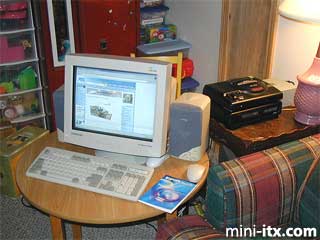
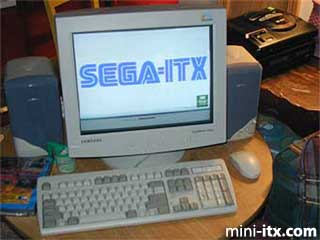
Here is the SEGA-ITX surfing the web at the VIA site. Thank you VIA! At this time I have no plans for a floppy drive. I installed everything from CD boot disks I made.
Click to launch image viewer

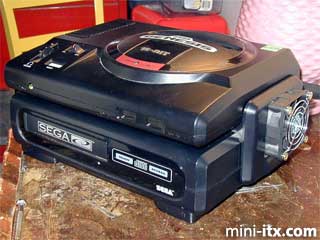
I added a fan to the side of the system since there's not much room for air circulation. It looks rather large from this angle but its really just a cpu fan. I may get a thinner one so it doesn't stick out so far. It's a little on the loud side so I used the trick of wiring it from the +12v to +5v and make it run at about +7v. Truthfully from what I've seen the system never gets hotter than "warm", unless you're running the dvd a lot, so I doubt you really need an external fan. The yellow HD activity LED I decided to wire into the hole marked for headphones on the front, and I taped off the gamepad connector holes. In order to reach the DVD drawer open button I had to drill a small hole in the face plate. I hated having to do that, but that's the only way you can open it from DOS. I use the old Apple paper clip trick to open the drawer :)
Click to launch image viewer

I cut down the cartridge door housing to make it fit again and put in the extra USB connections that came with the board. I had to cut off the firewire connectors because they were right up against the power connector and wouldn't fit. Here is my MuVo "cart" plugged in while I load up some mp3's. And to keep the SEGA case from sliding around on top of the CD case I used double faced tape in various places to stick it together. You can see the VIA EPIA mini-ITX sticker on the corner there :)
Click to launch image viewer

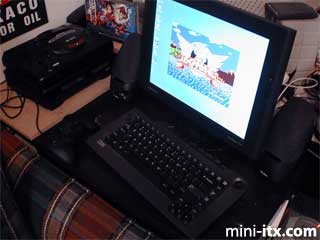
And here is the SEGA-ITX hooked up to a 15' black LCD, black cordless keyboard/mouse, black joystick, and black speakers. Looks nice in black!
Click to launch image viewer


-kaokensho

7/20/2012

Portable Screens you CAN and CANNOT use.

So I have a couple of large boxes of broken game consoles, accessories and computer components.  And every once in a while I fish through them with the intent to create.  I've always wondered which portable screens to toss and which ones to salvage.  Turns out I'm not the only one.  The Michael Jordan of Console modding, Ben Heck and one of his moderators named bicostp went ahead and posted a general outline.

Due to a number of threads in recent memory asking about this subject, I feel it necessary to make this post. 

These screens WILL NOT work:
You cannot use these screens so stop asking.
    Game Gear
    Sega Nomad
    iPod / MP3 player
    MP4 player
    JuiceBox
    Digital Camera
    CD Player
    The New York Stock Exchange building
    Game Boy
    Nintendo DS
    Watch
    Game and Watch
    VideoNOW Player
    Laptop LCDs
    Clocks
    The majority of portable DVD players
    GP2X (about the one thing it doesn't do)
    Printer
    Any other integrated device I forgot.

These screens WILL work:
    Pocket TV with video input
    PSone screen
    Hip Gear controller
    Most stand-alone car rearview camera LCDs
    Any other screen that was designed to accept analog video signals


Special Cases
These will work, bu
t need simple supporting hardware.
    Game Boy Advance - video input cartridge, but you need to leave the entire game boy intact
    Game Gear - Needs the TV tuner. Only works with some systems.
    Sega Nomad - Accepts analog RGB, most older game consoles output RGB.
    Nintendo DS - You need the GBA video input cart. The entire DS must be together.
    PSP: The PSP screen can be hacked to accept RGB, but you may need a board to decode composite or s-video to that point.

Why you cannot use these screens
These screens use digital signals to produce the image. That's why it's pixel-perfect. Video game systems output analog signals, like composite video, that your TV understands. Game system LCDs have the right hardware to decode the video and make it the digital signals the LCD understands. It's cheaper and smaller to make the motherboard talk directly to the screen than it is to use encoding and decoding hardware, but analog signals are more compatable (as you would need for a home console). Since the companies don't expect you to take those things apart and use the screens, they don't see a need for analog video signals. You could build a decoder board, but this is far out of most peoples' capabilities. (Decoder boards are complicated.)

Long story short: Unless your screen came with all the hardware necessary to take composite, component, or S-Video signals, don't bother.
-kaokensho

Playstation 2 Modems

Fellow UG member Infernos put together this great post about a little known part of the Playstation 2's online history.  While I never used the PS2 online via LAN, I did enjoy the Sega Dreamcast's build in 56k modem.  Yep used it so much I bought the Sega keyboard for $20.  Good times.  Many thanks to Infernos!

There were external USB modem for the PlayStation 2 available, in Japan only though. They attached through USB and allowed for 56K connections.
Like demonstrated in this pic below:


And since this stuff isn't that well documented at all, I thought I give it a try and shine a little light on them.
So here we go, as far as I could tell there were 6 of them in total:


SUNTAC OnlineStation


IO Data P2GATE


AIWA PV-PS200


Omron Viaggio ME56PS2


Buffalo IGM-UB56PS2C


ASCII MODEM USB


And finally, here's the software (not all of these are games, mind you) that supported these USB Modems:

Age of Empires II: The Age of Kings
Armored Core 2: Another Age
Armored Core 3
Battle Gear 2 (aka Tokyo Road Race)
Capcom vs. SNK 2: Millionaire Fighting 2001
Chou! Rakushii Internet Tomodachi Nowa
Cyber Jansou
EGBrowser
Eisei Meijin VI
Final Fantasy XI
The Seed
Taikyoku Mahjong: Net de Ron!

The titles that were also released in the West (US and/or Europe) are in bold.
And as you can probably tell - out of those games that made it to the West, only FFXI carried over the online features.  Plus, I think it's safe to say that the online servers for these have been shut down a long time ago.
Well, hope you folks enjoyed this little history lesson 
Cheers! -Infernos

6/29/2012

Reprogrammable NES cart

As featured before on this site there are some great aftermarket ROM readin' carts out there.  This fearless blogger has bypassed the $100+ price of these carts and started himself. Using two AT49F002 (256K) flash chips and some basic code recompilation he has created his own home brew vision.  I applaud  this project because now he can load any new home brew and any other misc rom straight through his nes.  There, as always, are a few issues with this project as it is currently.  One is the various mappers that Nintendo used throughout the nes's long lifespan. You see the NES sucked, hardware wise.  So too bypass the lack of power in the system they added it on the cart where it mattered.  The same idea was used later withe the Super Nintendo the the carts supporting the FX chip, like starfox and that horrible racing game.  Anywho, the other issues is that you would need to program the eprom chips with a piece of hardware know as a eprom programmer.  These gadgets range anywhere from $40-$500 bucks and unless you know what you are doing they are simply worthless.  This is one of those project I would like to tackle before I die  Or perhaps I may just hop over to retrousd.com and buy one outright. Either way THIS is a nicely detailed and informative site totally worht checking out! kaokensho

6/28/2012

Old School Hybrid

Some may say that this mod isn't all that but as a big fan of the Playstation One I think that this mod has merit.  This modder placed a 1st generation PS1 into his son's PC case.   I think hybrid hardware is always cool.  The frightning thing is the very exposed PSX CD drive on the side.  There must be some sort of clam shell cover that could be added to protect it.  You can check out the modders site @ afrotechmods.   -kaokensho

6/26/2012

Keep Dreamin'


For many many the Sega Dreamcast holds a special place in our hearts...not so much in our Cadillac. Don't get me wrong I know for a fact that 99% of the auto industry's built in video games are mere shadows of games that were never fun in the first place.   However, I just can't help but wonder about the technical issues here.  For example the Dreamcast uses a disc drive!  I understand that the Cadillac offers a smooth ride but this is the real world we're talking about. It also appears that the side cooling vents are covered, possibly leading to a shorter lifespan. If it needs to be portable than let's go back to the early 80's where the original portable entertainment system was born....the BOOMBOX!  There are many great DIY projects to check out on the Chinese based blog XCKDIY.  Of course there is much more there such as Gamecube and GBA projects as well.  There is more show then tell but Google Chrome will translate into English if you choose to do so. Oh yes and the Caddy mod is American made and not featured with the cool kids on XCKDIY.  Toodles! -kaokensho

6/25/2012

Handheld Gamecube


The disc reader sits under the LCD display, which hinges up for access, and there are all the usual controls culled from an original Game Cube controller.  No word on how long it too nor how much it cost to put together, though.
To be fair, it’s apparently not entirely portable, since there’s no battery compartment; instead you have to plug it into an AC adapter.  Techknott made it on commission for someone, so if you like the style and handiwork and you want a classic console twisted into a portable housing, it might be worth giving him a shout.

Originally posted on slashgear-kaokensho

4/19/2012

72 Pins - Adding a Retro Twist to Modern Art


Here's a collaborative of artist, retro NES fans, and an art shop all in one.  They have several artist who create artwork that is then applied with a high quality gloss coated vinyl sticker onto a working donor NES cart.  No they aren't programmers making new NES games while they wait around to be sued.  They are artist and they're worth checking out at www.blog.72pins.com

-kaokensho